JLab Mini Earbuds Manual: Troubleshooting & Usage
Navigating JLab Mini Earbuds requires understanding pairing, charging, controls, and potential issues; this manual offers solutions, including a seven-tap reset for synchronization problems.
Welcome to the world of JLab Mini Earbuds! These compact audio companions are engineered to deliver a surprisingly powerful and immersive listening experience, perfect for on-the-go lifestyles, study sessions, or simply enjoying your favorite tunes. Designed with both comfort and functionality in mind, the JLab Mini Earbuds offer a secure fit and intuitive controls, allowing you to seamlessly manage your music and calls.
However, like all Bluetooth devices, occasional hiccups can occur. This manual serves as your comprehensive guide to maximizing your JLab Mini Earbuds experience, covering everything from initial setup and pairing to troubleshooting common issues. We understand the frustration of connectivity problems, especially when you need your audio for important tasks like exam preparation. We aim to provide clear, step-by-step instructions to resolve these issues efficiently. Remember, a simple seven-tap reset can often restore functionality, but patience and following the correct procedure are key.
Unboxing and Components
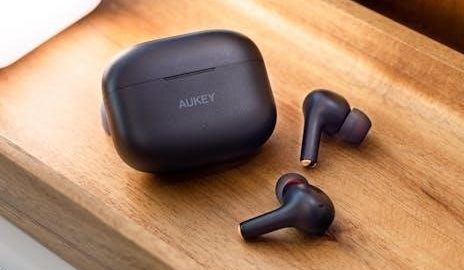
Inside the JLab Mini Earbuds packaging, you should find several key components ensuring a complete and enjoyable user experience. First, you’ll receive the JLab Mini Earbuds themselves – a left and a right earbud, designed for a comfortable and secure fit. Alongside the earbuds, you’ll discover the charging case, which serves as both a protective housing and a portable power bank, extending your listening time.
Additionally, the package includes a USB charging cable, used to replenish the case’s battery. You may also find a selection of ear tips in varying sizes (Small, Medium, and Large) to customize the fit to your ear canal for optimal sound isolation and comfort. Carefully inspect all components upon unboxing to ensure nothing is missing or damaged. Retain the original packaging for potential warranty claims or returns. If any items are absent, contact JLab customer support immediately for assistance;
Setting Up Your JLab Mini Earbuds
Begin by pairing the earbuds with your device via Bluetooth, ensuring a stable connection; then, charge both the earbuds and the case fully for optimal performance.
Pairing with Bluetooth Devices
Establishing a Bluetooth connection with your JLab Mini Earbuds is a straightforward process. First, ensure the earbuds are fully charged and inside the charging case. Remove both earbuds from the case; they will automatically enter pairing mode. Your Bluetooth device should then detect “JLab Mini” as an available device. Select “JLab Mini” to initiate pairing.
If pairing fails initially, try forgetting the device from your Bluetooth settings and repeating the process. Sometimes, one or both earbuds may appear as separate devices; if this occurs, perform the seven-tap reset procedure on each earbud (as detailed in the reset section) before attempting to pair again. A slight button tap on each earbud after removing them from the case, followed by three taps, can also help re-sync them. Remember to keep the earbuds close to your device during pairing for a stronger signal. Successful pairing is indicated by a solid white light on one earbud.
Charging the Earbuds and Case
To charge your JLab Mini Earbuds, place them inside the charging case. The case’s LED indicator will illuminate, displaying the charging status. A full charge typically takes approximately 1.5 to 2 hours. When the earbuds are fully charged, the case’s LED will indicate a full charge. To charge the case itself, connect it to a power source using a USB-C cable (not always included).
If the case isn’t charging, ensure the cable and power adapter are functioning correctly. A slow or intermittent charge may indicate a faulty cable or adapter. If the earbuds aren’t charging within the case, try cleaning the charging contacts on both the earbuds and inside the case. Consistent charging issues may require contacting JLab support for assistance. Avoid overcharging the earbuds or the case, as this can potentially reduce battery lifespan.
Understanding Earbud Controls
JLab Mini Earbuds utilize tap controls for playback, volume, and accessing features; mastering single, double, triple, and seven-tap functions unlocks full functionality.
Single Tap Functions
A single tap on either JLab Mini Earbud offers core control options, streamlining your listening experience. Primarily, a single tap serves as the play/pause command. When music or a podcast is actively playing, one tap will immediately halt the audio, and another single tap will resume playback from where you left off.
This functionality extends to calls as well. If you’re engaged in a phone conversation, a single tap will answer an incoming call. During an active call, a single tap will effectively mute or unmute your microphone, allowing you to temporarily silence your side of the conversation without disconnecting.
It’s a quick and convenient way to manage audio and calls without needing to reach for your connected device. Mastering this simple gesture is fundamental to efficient JLab Mini Earbud operation, providing instant control at your fingertips.
Double Tap Functions
Executing a double tap on your JLab Mini Earbuds unlocks volume control capabilities, offering a convenient way to adjust audio levels directly from the earbuds themselves. A double tap on the right earbud increases the volume, making your audio louder. Conversely, a double tap on the left earbud decreases the volume, lowering the audio output.
This feature allows for precise volume adjustments without needing to interact with your paired device, which is particularly useful during workouts or when your hands are occupied. The responsiveness of the double-tap function ensures quick and accurate volume changes.
Remember to practice the timing of the double tap – two quick, successive taps are required for the function to register correctly. Consistent use will make volume adjustments second nature, enhancing your overall listening experience with the JLab Mini Earbuds.
Triple Tap Functions
Utilizing the triple tap function on your JLab Mini Earbuds activates voice assistant compatibility, providing hands-free control over your smartphone’s features. A triple tap on either the left or right earbud will summon your device’s default voice assistant – Siri, Google Assistant, or Bixby – allowing you to issue commands verbally.
This functionality enables you to make calls, send messages, play music, get directions, and much more, all without physically interacting with your phone. Ensure your device’s voice assistant is enabled for seamless operation. The triple tap is designed for quick and reliable activation, streamlining your daily tasks.
Experiment with different voice commands to fully leverage the capabilities of your chosen assistant. Consistent, deliberate triple taps will ensure the function responds accurately, enhancing convenience and accessibility.
Seven Tap Reset Procedure
When experiencing pairing difficulties or erratic behavior, the seven-tap reset procedure is crucial for restoring your JLab Mini Earbuds to their factory settings. Begin by ensuring the earbuds are securely placed inside the charging case. Then, rapidly and consecutively tap the button on one earbud seven times. A successful reset is indicated by the earbud blinking blue four times.
Repeat this process – seven taps – on the other earbud, confirming it also blinks blue four times. This clears the existing Bluetooth connection and prepares the earbuds for re-pairing. After completing the reset on both buds, remove them from the case. One earbud should illuminate solid white, signaling readiness for connection.
If the blinking sequence doesn’t occur, ensure the taps are quick and deliberate; This reset doesn’t resolve physical damage, but addresses software glitches.

Troubleshooting Common Issues
Addressing connectivity, charging, and functionality problems, this section provides targeted solutions for common JLab Mini Earbud issues, ensuring optimal performance and user satisfaction.
Earbuds Not Pairing
Experiencing difficulty connecting your JLab Mini Earbuds to your device? First, ensure Bluetooth is enabled on your smartphone or tablet. Completely “forget” or remove any previous “JLab” device listings from your Bluetooth settings – this clears old connections that can interfere.
Next, perform the seven-tap reset procedure on each earbud while they are inside the charging case. Look for a blue blinking light indicating a successful reset (though some users report inconsistent blinking). After resetting, remove the earbuds from the case. One should illuminate solid white, signaling pairing mode.

If they still don’t appear, try a slight button tap on each earbud to manually power them on, then attempt a three-tap sequence on each. Some users found this re-syncs the buds. Holding the button for ten seconds will power them off. If problems persist, contact JLab support via DM with your email address for further assistance.
One Earbud Not Working
If only one JLab Mini Earbud is producing sound, several troubleshooting steps can be taken. Begin by verifying that both earbuds are adequately charged; a low battery in one can cause connectivity issues. Attempt the seven-tap reset procedure on both earbuds individually while inside the charging case, observing for the blue blinking confirmation.
After the reset, remove both earbuds from the case. Ideally, one should display a solid white light, indicating pairing mode. If neither appears in your Bluetooth settings, or they show as separate devices, repeat the reset process. A three-tap sequence on each earbud, while outside the case, has reportedly helped re-synchronize them;
Ensure the volume is balanced on your connected device. If the issue continues, contact JLab support directly, providing your email address for personalized assistance and potential solutions.
Earbuds Not Charging
When your JLab Mini Earbuds aren’t charging, first inspect the charging contacts on both the earbuds and within the charging case for any debris or obstructions. Gently clean these contacts with a dry, soft cloth. Ensure the earbuds are properly seated within the case; a loose connection prevents charging.
Try a different USB-C cable and power adapter to rule out a faulty charging source. Confirm the charging case itself has sufficient power; if the case isn’t charging, the earbuds won’t either. A complete discharge of the earbuds might require a longer initial charging period.
If problems persist, a reset might help. Perform the seven-tap reset on each earbud while in the case. If none of these steps resolve the issue, contact JLab support with your email for further assistance and potential warranty options.
Case Not Charging
If your JLab Mini Earbuds charging case isn’t charging, begin by verifying the USB-C cable and power adapter are functioning correctly with another device. Inspect the USB-C port on the case for any visible damage or debris, and clean it gently with a soft, dry cloth. Ensure a secure connection between the cable and both the case and the power source.
Try using a different USB-C cable and wall adapter, as some combinations may not provide sufficient power. A slow or intermittent charge could indicate a failing cable or adapter. If the case has been completely drained, allow it to charge for at least 30 minutes before attempting to check its charge level.
Should the issue continue, contact JLab support, providing details about the troubleshooting steps taken, and inquire about potential warranty options.
Advanced Features & Settings
Explore potential custom EQ settings and firmware updates via the JLab app to personalize your audio experience and optimize earbud performance.
Custom EQ Settings (if applicable)
JLab often provides customizable EQ (Equalization) settings through their companion mobile app, allowing users to tailor the sound profile of their Mini Earbuds to their individual preferences. These settings enable adjustments across various frequency bands – bass, mids, and treble – to enhance specific aspects of the audio.
Within the app, you may find preset EQ modes designed for different genres like pop, rock, or classical music, offering a quick way to optimize sound for particular listening experiences. Alternatively, a manual EQ mode typically allows for precise control, letting you fine-tune each frequency band to achieve a personalized sound signature.
Experimenting with these settings can significantly improve audio clarity, boost bass response, or reduce harshness, depending on your needs. Remember to save your custom profiles for easy access. If the JLab app doesn’t offer EQ settings for your Mini Earbuds model, consider exploring third-party EQ apps available for your smartphone.
Firmware Updates (if applicable)
Maintaining optimal performance for your JLab Mini Earbuds often involves updating their firmware. JLab periodically releases firmware updates to improve functionality, enhance Bluetooth connectivity, fix bugs, and potentially add new features. These updates are typically delivered through the JLab Audio companion mobile app.
To check for updates, connect your earbuds to your smartphone via Bluetooth and open the JLab app. The app will usually notify you if an update is available. Follow the on-screen instructions carefully during the update process, ensuring your earbuds remain connected and sufficiently charged throughout.
Interrupting the firmware update can potentially brick your earbuds, rendering them unusable. It’s crucial to avoid disconnecting the earbuds or closing the app during the update. Regularly checking for and installing firmware updates ensures you benefit from the latest improvements and a smoother user experience.

Safety and Maintenance
Protect your investment by cleaning the earbuds regularly, storing them safely in their case, and reviewing the warranty details for coverage information.
Cleaning Your Earbuds
Maintaining hygiene and optimal performance requires regular cleaning of your JLab Mini Earbuds. Begin by gently wiping the earbuds with a soft, dry cloth to remove any dust or debris. For more stubborn earwax or grime, slightly dampen the cloth with isopropyl alcohol – ensure it’s not dripping wet! Avoid getting any liquid inside the earbud openings.
Pay close attention to the mesh covering the speaker grills; use a dry cotton swab to carefully dislodge any obstructions. Never use sharp objects like toothpicks, as these can damage the delicate components. The charging contacts on both the earbuds and the case should also be cleaned periodically with a dry cotton swab to ensure a reliable connection.
Regular cleaning not only improves sound quality but also extends the lifespan of your earbuds. Avoid harsh chemicals or abrasive cleaners, as these can damage the materials. A simple, consistent cleaning routine will keep your JLab Mini Earbuds functioning at their best;
Storage Recommendations
Proper storage significantly impacts the longevity and functionality of your JLab Mini Earbuds. When not in use, always store the earbuds inside the provided charging case; this protects them from dust, moisture, and potential physical damage. Avoid exposing the case – and therefore the earbuds – to extreme temperatures, such as direct sunlight or freezing conditions.
Keep the charging case in a dry, secure location. Avoid storing it in areas prone to humidity, like bathrooms, as moisture can corrode the internal components. It’s also advisable to avoid placing heavy objects on top of the case, as this could potentially damage it.
Before long-term storage, ensure the earbuds are fully charged. This helps to maintain the battery health. Periodically check the charge level even during storage and top it up if necessary. Following these simple storage recommendations will help ensure your JLab Mini Earbuds remain in optimal condition for years to come.
Warranty Information
JLab Audio provides a warranty against defects in materials and workmanship for a period of one year from the date of original purchase. This warranty covers normal use and does not extend to damage resulting from misuse, accidents, or unauthorized modifications. Proof of purchase is required for all warranty claims.
To initiate a warranty claim, please visit the JLab Audio website and complete the online warranty form. You may be asked to provide photos or videos demonstrating the defect. JLab Audio will, at its discretion, repair or replace the defective product.
This warranty does not cover normal wear and tear, battery degradation, or damage caused by improper cleaning or storage. Shipping costs for returning the product are the responsibility of the customer. For complete warranty details and limitations, please refer to the JLab Audio website’s warranty policy section.