
Welcome to the Dometic RV Air Conditioner User Manual, your comprehensive guide to understanding, installing, and operating your unit for optimal cooling and comfort on the go.
Overview of the Dometic RV Air Conditioner
The Dometic RV Air Conditioner is a high-performance, energy-efficient cooling solution designed for recreational vehicles. It features a compact, low-profile design that minimizes roof space while providing powerful cooling and heating options. With advanced ductwork and user-friendly controls, this system ensures optimal comfort in various climates. Its robust construction and quiet operation make it ideal for mobile living, offering reliability and efficiency on the go.
Importance of Reading the User Manual
Importance of Reading the User Manual
Reading the Dometic RV Air Conditioner user manual is crucial for safe and efficient operation. It provides essential safety precautions, installation guidelines, and troubleshooting tips. Understanding the manual ensures proper use, prevents potential risks, and helps maintain optimal performance. Familiarizing yourself with the content guarantees a seamless experience and extends the lifespan of your unit.

Key Features and Benefits of the Dometic RV Air Conditioner
The Dometic RV Air Conditioner offers energy efficiency, compact design, and advanced cooling options, ensuring optimal comfort and performance for your recreational vehicle needs always.
Energy Efficiency and Performance
The Dometic RV Air Conditioner is designed for high performance and energy efficiency, ensuring consistent cooling and heating in extreme temperatures. With advanced airflow technology and smart sensors, it optimizes energy use while maintaining comfort. Its robust design ensures reliable operation, making it ideal for RVs where power resources may be limited. This unit balances power and efficiency seamlessly.
Compact Design and Low Profile
The Dometic RV Air Conditioner features a compact, low-profile design that reduces wind resistance and enhances aerodynamics. Its slim shape ensures minimal roof space usage, allowing for easier installation and more room for additional RV equipment. Built with durability in mind, this design supports energy efficiency while maintaining a sleek appearance, making it ideal for modern RVs.
Advanced Cooling and Heating Options
The Dometic RV Air Conditioner offers advanced cooling and heating options, providing consistent comfort in all seasons. With dual-mode functionality, it supplies fresh, dehumidified air in summer and warm air in winter. The system efficiently transitions between cooling and heating, ensuring optimal temperature control. Its advanced design complements your RV’s heating system, delivering reliable performance and enhancing your travel experience with precision and comfort.
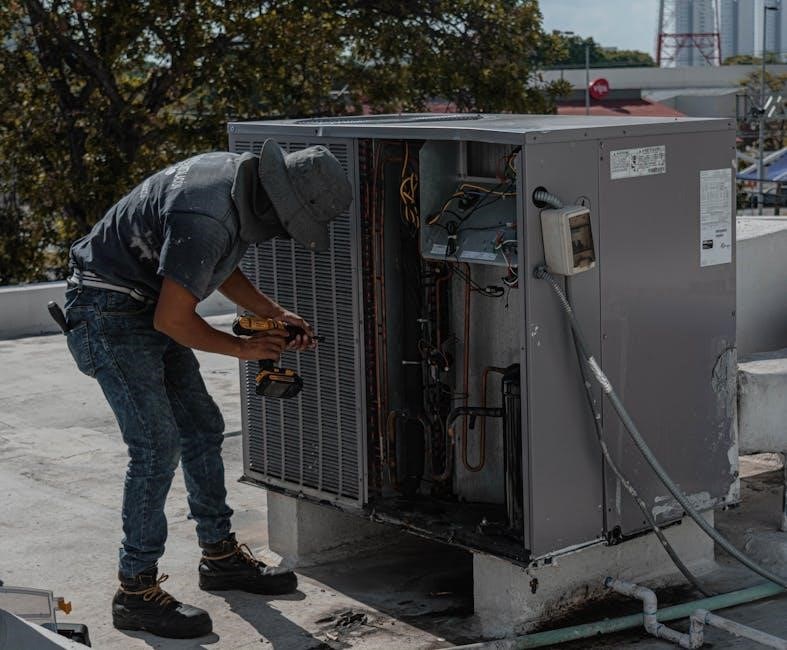
System Components and Parts
The Dometic RV Air Conditioner includes a roof-mounted unit, control panel, thermostat, ventilation components, and ductwork. These parts work together to ensure efficient cooling and heating performance.
Roof-Mounted Air Conditioner Unit
The roof-mounted air conditioner unit is the core component, designed to provide efficient cooling and heating. It is installed directly on the RV roof, requiring proper alignment with the square hole and a weather-tight seal using a gasket. The unit’s low-profile design minimizes wind resistance while maximizing performance. Always ensure the unit is securely fastened to the roof to prevent damage or leaks during travel.
Control Panel and Thermostat
The control panel and thermostat are essential for managing your Dometic RV air conditioner. The control panel features buttons for mode selection, temperature adjustment, and fan speed control. The thermostat ensures precise temperature regulation, optimizing both cooling and heating performance. Designed for user-friendly operation, the control panel provides clear LED indicators and intuitive controls, making it easy to maintain your desired comfort level while on the go, ensuring energy efficiency and consistent airflow.
Ventilation and Ductwork Components
The ventilation and ductwork components are crucial for efficient airflow in your Dometic RV air conditioner. The system includes vents, ducts, and grilles that distribute cooled or heated air throughout the RV. Proper installation and alignment of these components ensure even air distribution and optimal performance. Regular cleaning and inspection of vents and ducts are essential to maintain airflow efficiency and prevent dust buildup, ensuring your RV stays comfortable year-round.
Safety Precautions and Warnings
Ensure safe installation and operation by avoiding roof access during maintenance and adhering to electrical safety guidelines to prevent injury or damage to your Dometic RV air conditioner.
General Safety Guidelines
Always follow safety guidelines to prevent accidents and ensure efficient operation. Avoid climbing on the RV roof for maintenance, as it poses a significant fall risk. Ensure proper installation by a qualified technician and adhere to electrical safety standards. Never ignore warnings or cautions in the manual, as they are critical for safe usage. Failure to comply may result in serious injury or damage to the unit. Regular inspections by professionals are recommended to maintain safety and performance.
Risk of Falling from the RV Roof
Climbing on the RV roof to maintain or repair the air conditioner is extremely dangerous and can lead to serious injury or death. Always avoid standing on the roof, especially near the unit. Use a ladder safely and ensure proper support. If maintenance is required, consider hiring a qualified technician to minimize risks and ensure your safety. Always prioritize caution when working at heights.
Electrical Safety Considerations
- Ensure proper wiring and circuit capacity to handle the air conditioner’s power requirements.
- Always use a grounded electrical connection to prevent shock hazards.
- Avoid overloading circuits, as this can cause overheating or fire risks.
- Never modify the electrical system of the unit, as it may void the warranty or pose safety risks.
- Keep the air conditioner and its components dry to prevent electrical damage or shock.

Installation Steps and Requirements
Proper installation of your Dometic RV air conditioner is crucial for safe and efficient operation. Ensure the unit is aligned, securely fastened, and level. Use the provided gaskets and fasteners for a leak-proof seal.
Preparation for Installation
Begin by unpacking and inspecting the air conditioner unit for damage. Position the RV in a stable, level location. Align the unit with the roof hole, ensuring the gasket is properly seated. Secure the unit using the provided hardware, tightening evenly to avoid damage. Double-check electrical connections for safety and compatibility. Always follow safety guidelines to prevent accidents during installation.
Positioning and Aligning the Unit
Position the air conditioner over the roof gasket, ensuring the square hole in the RV roof aligns with the unit’s corners. Have one person inside the RV to guide alignment while another adjusts on the roof. This method ensures accurate placement and a secure fit, preventing leaks and ensuring proper operation. Follow the manufacturer’s instructions for precise alignment.
Securing the Air Conditioner to the Roof
Once aligned, secure the air conditioner by inserting screws through the M8 mounting holes into the RV roof. Tighten evenly to ensure a leak-proof seal. The gasket must be properly seated to prevent air leaks and water ingress. Follow the manufacturer’s torque specifications to avoid damaging the roof or the unit. Ensure all fasteners are tightly secured for stability.

Operating the Dometic RV Air Conditioner
Learn to operate your Dometic RV air conditioner efficiently. Understand how to turn it on, set the temperature, and utilize various modes for optimal comfort and energy efficiency.
Turning On and Setting the Temperature
To start your Dometic RV air conditioner, switch the power on at the control panel. Use the thermostat to set your desired temperature. Ensure the mode is set to Cool, Heat, or Fan based on your needs. The digital display will show the selected temperature. Allow a few minutes for the system to adjust. For optimal performance, monitor and adjust settings as necessary to maintain comfort.
Understanding the Control Panel Functions
The control panel is the central interface for operating your Dometic RV air conditioner. It features buttons for mode selection (Cool, Heat, Fan), temperature adjustment (up/down), and fan speed control. The digital display shows the current settings. Use the mode button to switch between cooling, heating, or fan-only operation. The timer function allows you to set startup or shutdown times for energy efficiency. Familiarize yourself with these functions to optimize comfort and performance.
Operating Modes and Settings
Your Dometic RV air conditioner offers multiple operating modes, including Cool, Heat, and Fan. The Cool mode lowers the temperature, while Heat mode provides warmth. Fan mode circulates air without cooling or heating. Adjust settings using the control panel, such as fan speed (low, medium, high) and temperature. Some models feature Econo-Cool or Auto mode for energy efficiency. Use the timer to schedule operations and optimize comfort during travel or rest.
Maintenance and Upkeep
Regular maintenance ensures optimal performance and longevity of your Dometic RV air conditioner. Schedule routine checks, clean filters, and inspect components to prevent issues.
Cleaning the Air Filter
Regularly cleaning the air filter is essential for maintaining your Dometic RV air conditioner’s efficiency and performance. Turn off the unit, remove the filter, and gently wash it with mild soap and water. Allow it to dry completely before reinstalling to ensure proper airflow and prevent dust buildup. Replace the filter if damaged or worn out for optimal results.
Inspecting and Replacing Parts
Inspect your Dometic RV air conditioner parts monthly for damage or wear. Replace any damaged or corroded components to ensure optimal performance. Regularly check ducts, vents, and electrical connections for integrity. If a part is faulty, use genuine Dometic replacements to maintain efficiency and warranty validity. Proper installation of new parts is crucial for reliable operation and safety.
Winterization and Storage Tips
Winterize your Dometic RV air conditioner by draining condensation and protecting it from freezing temperatures. Cover the unit to shield it from debris and moisture. Store the RV in a dry, secure location, ensuring the air conditioner is clean and free of obstructions. Disconnect power and inspect the unit before storage to prevent damage. Regular checks during storage ensure optimal performance when reused.
Troubleshooting Common Issues
Identify and resolve common problems with your Dometic RV air conditioner using diagnostic tools and error codes. Address issues like uneven cooling, noise, or system shutdowns promptly to ensure optimal performance and extend the unit’s lifespan. Always refer to the manual for specific solutions and safety guidelines.
Diagnosing Common Problems
Identify issues by checking error codes, unusual noises, or poor performance. Common problems include power supply issues, sensor malfunctions, or blocked drains. Consult the manual for specific troubleshooting steps, ensuring safe and effective repairs. Regularly inspecting components and addressing minor issues early can prevent major breakdowns and maintain optimal functionality of your Dometic RV air conditioner.
Resetting the Air Conditioner
To reset your Dometic RV air conditioner, turn it off, wait 30 seconds, and then restart it. This simple process often resolves issues like error codes or malfunctioning. For some models, a dedicated reset button may be available. If problems persist, refer to the manual for specific reset instructions or contact customer support for assistance. Ensure proper operation before continuing use.
Addressing Error Codes
Error codes on your Dometic RV air conditioner indicate specific issues. Refer to the user manual for code explanations and troubleshooting steps. If the issue persists after following manual instructions, contact Dometic customer support for professional assistance. Always ensure the unit operates correctly to maintain efficiency and comfort during your travels.
Warranty and Customer Support
Dometic offers comprehensive warranty coverage and dedicated customer support. Refer to your manual for details or contact their team for assistance, ensuring optimal performance and peace of mind.
Understanding the Warranty Coverage
Dometic provides comprehensive warranty coverage for your RV air conditioner, ensuring protection against manufacturing defects. The warranty typically covers parts and labor for a specified period, varying by model and region. Exclusions may include wear and tear or improper installations. Review your manual for details or contact customer support to verify coverage and filing claims effectively.
Contacting Dometic Customer Service
For assistance with your Dometic RV air conditioner, contact customer service via phone, email, or through their official website. Visit dometic.com for support options, including live chat, FAQs, and downloadable resources. Ensure to have your model number and manual available for efficient problem resolution. Their team is ready to address inquiries, repair requests, and warranty-related matters promptly and professionally;
Accessing Additional Resources
For further assistance, visit the official Dometic website to access PDF manuals, installation guides, and troubleshooting tips. Explore their support section for FAQs, technical datasheets, and product-specific documentation; Additionally, contact Dometic’s technical support team via email or phone for personalized assistance with your RV air conditioner. Their resources ensure optimal performance and address all user needs effectively.
This concludes the Dometic RV Air Conditioner User Manual. By adhering to the guidelines, you ensure optimal performance and safe operation, enhancing your RV experience effectively.
Final Tips for Optimal Performance
Ensure proper installation and regular maintenance for your Dometic RV Air Conditioner. Clean filters monthly, inspect ductwork for leaks, and check refrigerant levels. Maintain good airflow by keeping vents unobstructed. Refer to the manual for specific guidelines and troubleshooting tips. Always follow safety precautions to avoid damage or injury. By adhering to these practices, you’ll enjoy reliable cooling and heating for years to come.
Encouragement for Safe and Efficient Use
Always read the manual thoroughly before operating your Dometic RV Air Conditioner. Follow installation and maintenance guidelines carefully to ensure safety and efficiency. Regularly inspect and clean filters, check for leaks, and understand error codes for prompt troubleshooting. Avoid climbing on the RV roof for maintenance to prevent accidents. By adhering to these practices, you’ll enjoy a comfortable and reliable cooling experience on the road.